Well, rooting your phone simply means being able to have administrative access (and therefore, total control) on your android phone. It's like having administrator rights on your windows pc or superuser access on linux machine. Android is an operating system for mobile devices such as smart phones and tablet computers. It consist of a kernel based on linux kernel. So, if you are familiar with Linux OS, working with android shell is like working with linux. It's not always necessary to have root access, but besides being cool (especially for tinker fairies like me), it allows you to install useful applications not available on non-rooted phone. One such application I like is the Titanium backup. Well, it's just another backup utility but since it requires root access, it can do more than just secure your backup, that's a complete backup of your apps and application data. If you visit the market often, you might have stumbled upon a really cool app but, it requires root access. If you wanna try it, read on.
Disclaimer:
If you should attempt to follow this guide, please note that the author will not be held responsible for whatever abnormal operation (software / hardware) your mobile device might experience after tweaking it. The procedure involves using soft wares from android development communities and maybe considered unknown or untrusted by your mobile operator. Also, please note that this procedure automatically voids the warranty of your phone, so if you're completely unfamiliar with what are you doing, I suggest that you don't try it.
OK, let's get it on.
First, you'll need these soft wares (I recommend downloading them from the links below).
1) rageagainstthecage-arm5.bin &
2) Superuser package
http://wiki.cyanogenmod.com/wiki/ZTE_Blade_(Gen2):_Root_and_Recovery
3) ZTE Blade Windows Drivers
http://support.zte.com.cn/support/uploads/ZTE_Android%20USB_Driver_For_Microsoft_PC.rar
4) Android SDK
Just follow the procedure on how to install adb shell. Alternatively, you can just google how to get adb server running on your pc, after all, you don't really need the whole SDK package if you're not an android developer.Read more here:
http://developer.android.com/sdk/index.html
I suggest storing all the files in one location, preferably the \tools folder of the SDK path.
C:\Program Files\android-sdk_r10-windows\android-sdk-windows\tools
Now we're good to go.It's a relatively simple procedure if you have your pc setup just right. I provided some screenshots for easy reference. Just click on the pictures to enlarge.
First, set your phone debugging and unknown software installation options from the settings page. Make sure both options are checked.
Next, verify that adb server is properly installed. On the command line, type:
>adb start-server
This should display the output that looks like this:
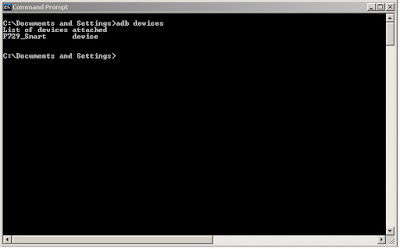
Verify that the phone is connected and recognized by your pc. To do this, type the following commands on the command line.
>adb devices
This should display the output that looks like this:

If the phone is connected and recognized by your pc,then run the following commands. Please look at the screenshot below for the summary and output of the following commands.
2)
>adb push rageagainstthecage-arm5.bin /data/local/tmp/
3)
>adb shell
4)
$chmod 755 /data/local/tmp/rageagainstthecage-arm5.bin
5)
$/data/local/tmp/rageagainstthecage-arm5.bin
Once the exploit finishes, in terminal, run the following commands:
6)
>adb kill-server
7)
>adb start-server
8)
>adb shell
NOTE: As you enter the adb shell, you should see a "#" at the command prompt. If you see a "$", then the exploit didn't work, please repeat steps 2-5. Else, proceed to the next step.
9)
#cd /system
10)
#ls
NOTE: If you see xbin at the output, perform the next command,if not, proceed to step 12.
11)
#mv xbin xbin.bak
12)
#mkdir /system/xbin
#exit
>adb push su /system/xbin/
>adb shell chmod 4755 /system/xbin/su
>adb push Superuser.apk /system/app/
Below are some screenshots of what we've done so far. These will show the commands and the output. Click on the picture to enlarge. As you may notice, the windows directory is different, that's because I opted to install the SDK files to a different directory.Just make sure that the required soft wares are in the current directory in the command line as you perform the procedure.
Congratulations! you're done. You now have root access on your Netphone. Verify this by installing root checker app by joeykrim from the android market.
Now you can install apps which require root access. Just be sure to allow the application as it requires root access elevation.You now have the superuser app installed on your phone, click on it to see apps with root access.
Here are additional screenshots before and after the rooting procedure.
Installed titanium backup which requires root access.
Enjoy your rooted Netphone, please follow & comment.
God Bless!


THANK YOU SO MUCH FOR THIS VERY HELPFUL POST!
ReplyDeleteThis is exactly what I am looking for.
This article is really a BIG a help for me.
Thank you, Thank you, Thank you!
Keep up the great work.
God bless!
Hi Rhegine, glad to be of help :)
DeleteApologies for the very very late reply, haven't revisited my blogs for a while.